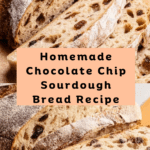
Chocolate Chip Sourdough Bread Recipe
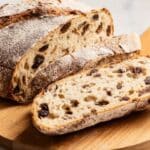
This Chocolate Chip Sourdough Bread combines the tangy depth of traditional sourdough with the sweet delight of rich chocolate chips. Perfect for breakfast or a sweet snack, this bread features a chewy crust, a tender crumb, and pockets of gooey chocolate throughout. Using a natural sourdough starter, the bread undergoes a series of stretch and folds for excellent gluten development, followed by a slow bulk fermentation and cold proofing to enhance flavor and texture. The baking process in a Dutch oven with steam ensures a perfect crust and soft interior.
- Prep Time: 1 hour 15 minutes
- Cook Time: 50-55 minutes
- Total Time: 10-14 hours
- Yield: 1 loaf (about 1.5 pounds / 680 grams) 1x
- Category: Bread
- Method: Baking
- Cuisine: American
Ingredients
Dough Ingredients
- 100 grams active sourdough starter (about 1 cup)
- 300 grams warm water (about 1 ¼ cup at 75-85ºF / 24-30ºC)
- 500 grams bread flour (about 4 cups)
- 10 grams salt (about 1 ¾ teaspoons)
Add-ins
- 1 cup chocolate chips (150–170 grams)
- 3–4 ice cubes (for baking steam)
Instructions
- Forming the Dough: In a large mixing bowl, whisk together 300 grams warm water and 100 grams active sourdough starter until the mixture becomes milky. Add 10 grams salt and 500 grams bread flour, then stir with a dough whisk or wooden spoon until a shaggy dough forms. Bring dough together with your hands as it becomes sticky. Cover the bowl with a damp towel or plastic wrap and let rest for 30 minutes.
- Stretch and Folds with Chocolate Chips: After resting, add 1 cup of chocolate chips to the dough. Wet your hands to prevent sticking, then perform stretch and folds: pull one corner of the dough up and fold it over the top, rotating the bowl and repeating 4-6 times clockwise. Cover the bowl tightly and rest for another 30 minutes. Repeat the stretch and fold process 2-3 more times (for a total of 3-4 sessions), noticing the dough become stronger and more pliable. Skip remaining folds if dough becomes too resistant.
- Bulk Rise (Bulk Fermentation): After the final stretch and fold, cover the bowl and allow the dough to ferment for 8-12 hours at room temperature or until it nearly doubles in size.
- Shaping and Cold Proof: Generously flour a proofing basket (banneton) with all-purpose or rice flour. Turn the dough onto a lightly floured surface, flatten and roll it up while folding in the sides until it forms a round or oval shape. Place the dough smooth side down into the floured basket, cover, and refrigerate for 8 hours or up to 48 hours for cold proofing, which improves oven spring and flavor.
- Final Proof and Oven Preparation: Remove the dough from the fridge and let it come to room temperature for about 2 hours. Position an oven rack near the bottom and place a Dutch oven inside. Preheat the oven to 450ºF (232ºC) with the Dutch oven inside about 45 minutes before baking to ensure thorough heating.
- Scoring the Dough: Turn the dough out onto parchment paper or a silicone mat about 10 minutes before baking. Use a bread lame, razor, or sharp knife to score a central cut and one curved cut on the left side to control expansion during baking.
- Baking with Steam: Carefully transfer the dough into the hot Dutch oven, add 3-4 ice cubes around the dough to create steam, and cover with the lid. Bake at 450ºF (232ºC) for 25 minutes with the lid on.
- Finishing the Bake: Remove the lid, reduce oven temperature to 375ºF (190ºC), and bake for another 25-30 minutes until the bread’s internal temperature reaches 200-205ºF (93-96ºC) and the crust is deep golden brown.
- Cooling: Remove the bread carefully from the Dutch oven and cool on a wire rack for at least 30 minutes before slicing and serving to allow the crumb to set.
Notes
- Storage: Wrap leftover bread tightly in plastic wrap and store at room temperature up to 3 days or refrigerate up to 4 days. For longer storage, slice and freeze up to 3 months; toast slices from frozen if desired.
- Without Cold Proofing: Final proof can be done at room temperature for 1-2 hours until puffy, then baked as directed.
- Active Starter: Use starter fed within last 12-24 hours, at its peak rise (doubled in size) for best results.
- Water Temperature: Water should be between 75-85ºF (24-30ºC) to support yeast activity without risking killing starter microbes.
- Flour Choice: Bread flour preferred for good gluten development; can substitute with all-purpose flour plus 20 grams vital wheat gluten per 500 grams flour.
- Use a digital scale for accuracy and consistent results.
- Proofing times vary with ambient temperature; colder environments slow rising.
- Float test for starter activity is optional but not always reliable.
Keywords: sourdough bread, chocolate chip bread, homemade sourdough, artisan bread, Dutch oven bread, naturally leavened bread, sweet sourdough, breakfast bread
Find it online: https://biteandenjoy.com/chocolate-chip-sourdough-bread-recipe/